Raspberry Pi3 Build Guide
Overview
This document serves as a quick start guide to build SDK examples for the Raspberry Pi 3 with Ethernet/WiFi connectivity. Steps mentioned here are not needed if compiling the SDK as a static library.
Prerequisites
Request access to the following repositories:
- https://github.com/verizonlabs/ts_sdk_c
- https://github.com/verizonlabs/paho.mqtt.embedded-c
- https://github.com/verizonlabs/mbedtls_custom
- https://github.com/verizonlabs/ts_sdk_c_platforms_unix_raspberry-pi3
Raspberry Pi 3 Preparation
Verify your Raspberry Pi 3 has latest Raspbian version (Version 9 or above): To determine your Raspberry Pi 3 version, in a terminal window, view os-release file content with command:
$ cat /etc/os-release

 PRETTY_NAME=“Raspbian GNU/Linux 9 (stretch)”

 NAME=“Raspbian GNU/Linux”

 VERSION_ID=“9”

 VERSION=“9 (stretch)”

 ID=respbian

 ID_LIKE=devbian

 HOME_URL=“http://www.raspbian.org/“

 SUPPORT_URL=“http://www.raspbian.org/RaspbianForums”

 BUG_REPORT_URL=“http://www.raspbian.org/RaspbianBugs”
Required tools
Verify and install the following required tools.
Verify git version, should be 2.11.0 or above:
$git --version
Verify cmake, should be 3.7.1 or above:
$cmake --version
Rebuilding
If you don't have the latest version, rebuild your Raspberry Pi 3 with following steps:
1. Connect the Raspberry Pi 3 to the internet using an Ethernet cable.
2. Restart the Raspberry Pi 3. During restart hold down the shift key to bring up the restoration window.
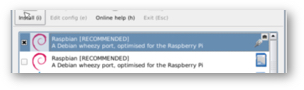
3. Select the "Raspbian [RECOMMENDED] ".
NOTE: Uncheck others if you have other previous installations.
4. Click on the "install" button, the latest Raspbian will be downloaded and installed.
Downloading the SDK
Follow the readme instructions https://github.com/verizonlabs/ts_sdk_c and checkout the following repository:
$ git clone https://github.com/verizonlabs/ts_sdk_c.git
$ cd ts_sdk_c
Dependency repositories
Run the following scripts to obtain the dependency repositories:
$ ./scripts/get_submodules.sh
You will be asked for your GitHub username and password multiple times. You can also setup your git environment with your login information.
NOTE: Repositories other than the ones listed above might not be accessible to you.
Registering Your Device and Preparing Security Certificates
Identify the MAC address of the Ethernet port of your Raspberry Pi 3 and reformat it properly.
1. Determine the MAC address of the Raspberry pi: In a terminal window, run
$ ./scripts/get_submodules.sh
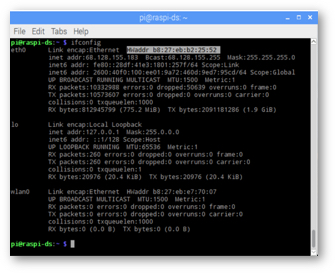
2. Identify the HWaddr for eth0 on your Raspberry Pi 3. In above screen it is “b8:27:eb:b2:25:52”. Remove the “:” and make all characters CAP, the proper formatted MAC address for a registered device in ThingSpace is “B827EBB22552”.
3. Register the device on to ThingSpace portal with above MAC address identified, device type as "ts.device.sdk.themometer" or "ts.device.sdk.packageTracker.legacy", download certificates to root of the repository checkout.
4. Prepare certificates for the sample application:
$ ./scripts/include_certs.sh thingspaceserver.pem B827EBB22552.cert.pem B827EBB22552.private.key examples/applications/simple/include/
5. Modify the line 70 of this file to replace the device id with your Mac address:
/ts_sdk_c_1/examples/platforms/ts_sdk_c_platforms_unix_raspberry-pi3/ts_driver_socket.c
Sample application
Use the below commands to prepare and compile the applications in examples/applications folder and create binary application file in folder: ts_sdk_c/cmake-build-debug/examples/applications.
Build ts_sdk and sample applications
$ cmake . -B./cmake-build-debug -DCMAKE_BUILD_TYPE=Debug -DBUILD_EXAMPLES=ON
$ cd cmake-build-debug
$ cd cmake-build-debug
1. Run applications Navigate to ts_sdk_c/cmake-build-debug/examples/applications folder (or add file path to your command), run application built above:
$ ./example_simple
2. While the example simple application is running, activate the device on the development portal and the simulated sensor data should be received and viewable under device history.