Qualcomm Cat M1 LTE Modem User Guide
Overview
ThingSpace is an Internet of Things (IoT) platform that offers a complete end-to-end solution for onboarding and activating your devices on the Verizon Wireless network. The ThingSpace client has been pre-integrated on the Qualcomm LTE CAT-M1 Modem. The combination of the LTE Cat-M1 capabilities of the modem with Verizon’s 4G LTE network and ThingSpace offers a simplified approach for building, deploying and managing IoT devices and applications, which can be customized for a wide-range of IoT use cases including asset management, industrial automation, wearables, smart cities and more.
By the end of this guide, you will know how to install the ThingSpace Client on your device and how to use the sample application to send and receive data through ThingSpace.
Before you begin
There are a few things you will need to do before you can get started.
1. Create a ThingSpace account here.
2. Download the following tools:
| Item | Description | Version | Source/Vendor | Purpose |
|---|---|---|---|---|
| 1 | ARM Compiler toolchain (RealView Compilation Tools (RVCT)) | ARMCT505B106 | ARM Ltd. | ThingSpace Build |
| 2 | Module vendor diagnostic and support tools | XX | Module vendor | Flashing build, access to file system and collecting logs |
| 3 | SCons | 3.0.1. or higher | www.scons.org | Construction tool required to build |
| 4 | Python | ActiveState | ActiveState | Supports build scripts |
| 5 | USB Network driver combo | XX | Module vendor | Windows host USB drivers sfor QTI composite devices |
Setting up ThingSpace
Login to core.thingspace.verizon.com/portal and submit a request to gain access to the ThingSpace Software Development Kit (SDK) for the Qualcomm 9206 modem.
Software Development Kit (SDK) library package
Folder structure
Here is the package folder structure:
Common Header Files: Consists of header files which are shared by both SDK and ThingSpace applications.
config_files – Contains application related configurations files
config.ini – This configuration file contains information related to the data model that is supported by application.
ts_app_autostart – This configuration fileʼs presence will start the application automatically after device bootup.
ts_sdk_config.ini – This configuration file contains the ThingSpace sever address and the APN used for the data call.
oem_app_path.ini – Contains the path to ThingSpace application binary location to be loaded as Downloadable Application Module (DAM)
SDK Library: ThingSpace SDK library for DAM and Kernel application
TS: ThingSpace sample application source
Ts_dam_img: SCons file to compile DAM Module.
ThingSpace build process as Downloadable Application Module (DAM) application
To build the ThingSpace and SDK library as a DAM please follow these steps:
1. Copy “TS\app” folder and “TS\txm_module_preamble.S” from TS Package SDK-Library to \src
2. Copy “SDK Library\SDK-DAM\ts_sdk.lib” from TS Package SDK-Library to \libs
3. Copy the header files from “Common Header Files” to \src\app\inc
4. Copy QAPI, ThreadX API, stringl header files to \include
5. Copy txm_lib.lib, timer_dam_lib.lib to \libs
NOTE: For ThingSpace application with actual sensors, remove the sensor simulate macro.
After organizing the folder structure as described and copying the necessary files, you are ready to compile the ThingSpace client.
From cmd line in:
$build_thingspace_app.bat
thingspace_app.bin gets created in \bin
Cleaning build:
$build_thingspace_app.bat -c
ThingSpace Sample app
Run the Sample app to send diagnostic data to the ThingSpace platform. Verify the results in your diagnostic tool logs.
1. Add config.ini file from the release package <TS Package/config_files /config.ini> into an alternate file location under the datatx folder.
2. Add ts_sdk_config.ini file from the release package <TS Package/config_files /ts_sdk_config.ini> into an alternate file location under the datatx folder.
This config file contains the following information:
| Parameter | Default value | Description |
|---|---|---|
| apn | vzwinternet | APN for establishing the data call |
| severip | simpm.thingspace.verizon.com | ThingSpace Server IP or URL |
| serverport | 8883 | Standard MQTT port (1883 without security, 883 with security |
| keepalive | 60 sec | Keepalive value for MQTT connection in seconds |
| clean_session | true | Controls clean session for MQTT connection |
| topics | Not present | TS-EP will subscribe to all the topics mentioned here. [“topic1”,“topic2”]If this item is not present, it will subscribe to only ThingSpace SDK/IMEI/TSServerPublishCommand. |
| opt_interval | 86400 sec | Interval between sending OTP report in seconds |
3. Add ts_app_autostart file from release package <TS Package/config_files /ts_app_autostart> into an alternate file location under the datatx folder.
a. This is an empty file used for auto starting the application; with the presence of this file, the ThingSpace application starts automatically.
How to run ThingSpace as a Downloadable Application Module (DAM)
When using ThingSpace application as a Downloadable Application Module (DAM), copy the “thingspace_app.binʼ to an alternate file system under the datatx folder. The oem_app_path.ini which contains the location of “thingspace_app.binʼ on the device file system should be copied to the datatx folder.
int ts_oem_app_start()

 {

 int ret;


 #ifdef QAPI_TXM_MODULE

 if(TX_SUCCESS != txm_module_object_allocate((VOID *)&ts_thread_handle, sizeof(TX_THREAD)))

 {

 return - 1;

 }

 #endif

 ret = tx_thread_create(ts_thread_handle, "ThingSpace APP Thread", vzw_client_thread, NULL,

 ts_app_stack, TS_THREAD_STACK_SIZE, TS_THREAD_PRIORITY, TS_THREAD_PRIORITY, TX_NO_TIME_SLICE,

 TX_AUTO_START);


 if(ret != TX_SUCCESS)

 {

 IOT_INFO("TS_OEM : Thread creation failed\n");

 }


 return 0;

}Integrating certificates
Certificates are required to establish a secure connection between the client and server. These certificates can be obtained directly from the ThingSpace Portal.
Click here for more information on Certificates.
How to download certificates
1. Login to ThingSpace and click the Credentials tab.
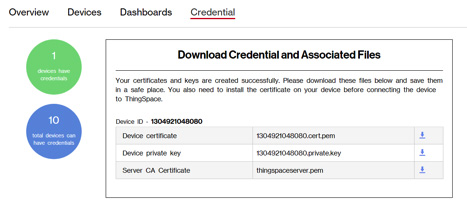
2. Download the certificates.
3. Add these “cacert.pem, client-cert.pem and client-key.pem” files to the datatx folder.
Sending and receiving data
Device messaging with ThingSpace allows you to route data from your embedded devices to other internet-connected services and extensions. It features a low-bandwidth ingestion protocol designed for resource-constrained devices. A message consists of a data payload and metadata. The payload is typically a text string, but can be binary data. Most diagnostic message data is automatically added on the server based on the message source, but you can also specify one or more topics. ThingSpace messages do include an overhead of on average 100 bytes.
Publishing data
Sending data from your device can be done easily using:
[

 /**

 * @brief Publish event to server

 * @param topic_name Publish to topic_name

 * @param pub_msg Message to be sent

 * @param msg_expiry_time Maximum validity(in secs) of published message in pending queue

 * If set as 0, message statys in queue till it is sent out

 * @return ESUCCESS or EFAILURE

 */


 int thingspace_publish_event(const char *topic_name, const char *pub_msg, uint32_t

 msg_expiry_time);

]By using the ThingSpace SDK, a baseline set of diagnostic data is sent from your device securely to our platform where it can be stored and consumed by your extension.
[

 #include "ts_sdk.h" /*include SDK header file*/

 #define PUB_MSG_EXPIRY_TIME (60) /*Pub message expiry time if queued*/


 json_msg = vzw_json_set_onboard_msg(); //construct message body


 if(json_msg != NULL) {

 IOT_DEBUG("ThingSpaceApp : Sending UNITOnBoard message\n");

 thingspace_publish_event(lh_pub_topic_onboard, json_msg, PUB_MSG_EXPIRY_TIME);

 /*send message to server*/

 tx_byte_release(json_msg);

 } else {

 IOT_DEBUG("ThingSpaceApp : Onboard msg creation failed\n");

 }

]Receiving data
Data can be sent through the ThingSpace portal to your end device or through an internet-connected services and extension.
[

 /**

 * @brief Invoked when message is receivied from server

 * @param topic Topic on which message has arrived

 * @param server_json_msg JSON message from ThingSpace sever

 */

 typedef void (*thingspace_process_message_callback)(const char *topic, const char

 *server_json_msg);

]You can then take action on your device based on the received message.
[

 /**

 * @brief Message callback

 * @param topic Topic name

 * @param server_json_msg Server published message

 */

 void message_callback(const char *topic, const char *server_json_msg)

 {

 char *json_msg = NULL;

 int updates;


 IOT_INFO("ThingSpaceApp : Message callback topic %s\n", topic);


 if(strcmp(topic, lh_sub_servercmd_topic) != 0) {

 IOT_INFO("ThingSpaceApp : Custom handling topic\n");

 return;

 }


 vzw_json_process_server_cmd_msg((char *)server_json_msg, &cmd_resp_data);


 if(flag != 1) {

 if(dev_onboard_seq >= 2) {

 flag = 1;

 IOT_DEBUG(

 "Flag is set to one, Dev provisioned. On board sequence completed\n");

 thingspace_update_profile_cfg(flag, curr_sens_index, NULL);

 }

 }


 updates = vzw_apply_updated_changes_to_hw(NULL, 0);


 if((updates > 0) || unitonboard_pub_req) {


 json_msg = vzw_json_create_last_device_state_msg();


 thingspace_update_profile_cfg(flag, curr_sens_index, json_msg);

 tx_byte_release(json_msg);

 unitonboard_pub_req = false;


 json_msg = vzw_json_set_onboard_msg();

 if(json_msg != NULL) {

 IOT_DEBUG("ThingSpaceApp : Sending UNITOnBoard message\n");

 thingspace_publish_event(lh_pub_topic_onboard, json_msg, PUB_MSG_EXPIRY_TIME);

 tx_byte_release(json_msg);

 } else {

 IOT_DEBUG("ThingSpaceApp : Onboard msg creation failed\n");

 }

 }


 json_msg = vzw_json_create_cmd_resp_msg(&cmd_resp_data);


 if(json_msg != NULL) {

 IOT_DEBUG("ThingSpaceApp : Sending ServerCmdResponse message\n");

 thingspace_publish_cmd_response(cmd_resp_data.uuid, json_msg, PUB_MSG_EXPIRY_TIME);

 tx_byte_release(json_msg);

 } else {

 IOT_DEBUG("ThingSpaceApp : Resp msg creation failed\n");

 }

 }


]Testing and Validation
Testing and validation will ensure your device can talk to and receive messages from the ThingSpace platform.
Viewing SDK logs
Create a ThingSpace account and download and install the certificates before any testing and validation. You should be able to see device logs from the ThingSpace SDK in your module vendor's diagnostic tools.